
Just a few words of caution here before proceeding. If you're using a hot glue gun with foam, make sure you're working in a very well ventilated area. The nozzle on the glue gun can cause the foam to melt, which produces toxic fumes. I'd even advise on using a dust mask just to be extra careful. Watch out for that nozzle and fresh glue coming from it as you can suffer up to second degree burns from either!
Also, please be EXTREMELY careful when using ANY sort of sharp tools! I've got a nice inch and a half scar on the inside of my hand that earned me 12 stitches and numerous cuts and scars on my thumb from cutting towards in. A really easy way to circumvent the ever prevalent thumb cuts is to just put a bandage or two on before starting. This way you can pull your knife towards your thumb without worrying about slicing right through it.
I'm using white on white with the gloss finish here because it was on sale at Michael's - an arts and crafts store with a few locations in both Canada and the States. Hobby Lobby should carry this stuff as well, along with pretty much any other arts and crafts/hobby store or even Walmart. The boards I got were a few 20"x30" inch, 1/4" thick boards.
I started off measuring off a 15"x1" strip of the foam core to make up the walls of the building.

Unlike what you're seeing here, you should be using a sharp, unrusted knife. I prefer and Exacto or a retractable/extendable thinner knife. When cutting this stuff, make sure you're SLICING it and don't apply excess pressure, it'll cause the foam to break up instead of being cut through. Initially, you want to cut through the card layer on the first pass, the foam on the second, and the bottom layer third. The three cuts help keep everything nice and crisp because the indentation in the material will help guide your knife along with whatever straight edge you want to use.
I do switch the blade out after this cut because of how jagged some of the edges came out.
Because of the smaller scale you'll be working with, you want to make your measurements as precise as possible. A single millimetre could throw off the shape of the building and how things line up. Make sure you have a set of filing tools on hand to overcome this.

After cutting the strip, I measure out sections of the walls; 2", 1", 2", 2", 3", and 4". For this particular building I wanted to create an L-shaped, three level apartment style building.

Here's the rough shape of the building. I do make two adjustments to the 3" wall on the left and the 4" wall on the bottom. I take a 1/4" off each to accommodate for the method I use to glue and bond the walls together. Make sure you do a quick dry fit like this, as you may need to make adjustments as well. Masking take works well here to hold everything in place temporarily.

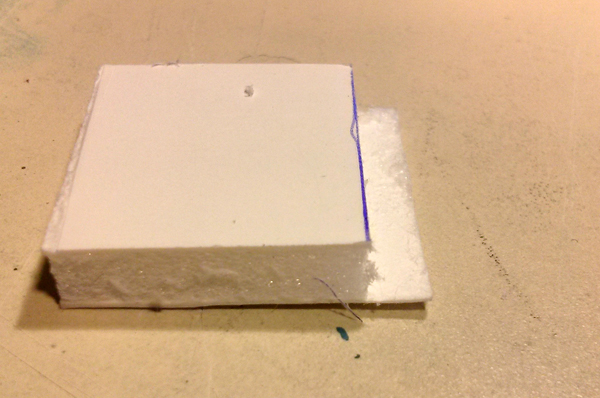
This is outlining the above mentioned method of joining the walls. You want to take two pieces of foam, lining first one perpendicular against the edge of the wall, and the second on top of the wall, also perpendicular. You'll make two cuts here, one through the first layer of card and the second through the foam. Take care not to cut through the bottom layer of card, as this will take off the layer and diminish the purpose of this method.

You'll be left with this; the bottom layer of card hanging out, uncut. This provides a nice right angle that the wall joining this will slot into nicely and provide two surfaces to hold glue.
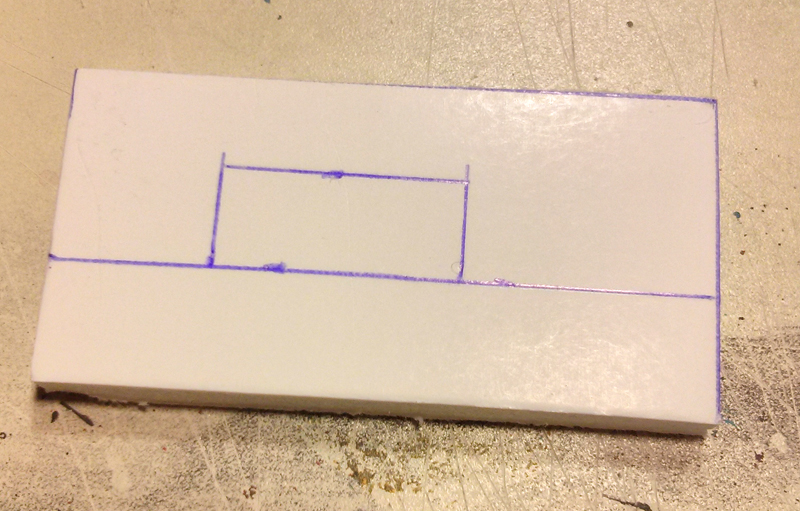
For this building I cut out a few windows. If you want to do this, make sure you measure, draw up, and cut out the windows before the walls are glued together, it'll save a huge amount of time and effort.
Here's two of the walls joined together. I'm using a hot glue gun for this building, as it bonds the joints faster than regular white glue so I can work more consistently, and I also find that the bond is stronger. This is because of how water soluble the two mediums are; white glue can be thinned with water, where as hot glue doesn't thin without chemicals.
The hot glue doesn't get absorbed by the foam, so when you push the two walls together you may get some excess seeping out of the joint. Once the glue is dry you can just take your knife to the excess glue and cut away at it.

Here's a diagram of the join. The green line is the outer card layer, and the blue is the exposed foam layer.

After cutting out the windows for each wall section and cutting away the joints, I have a basic and sturdy wall structure ready for two more levels and some details.

Using the same methods as previously mentioned, I end up with three levels total. I found that each section got quicker as I went along. Muscle memory for the win. (The Hordes box was from a unit of Trollbloods Scattergunners that are currently awaiting paint and also provides some of the bases for this building)

After the structure is completed, I add bases/floors to each level. In this case I used some heavier cardstock which you can get from pretty much any box of anything. I find that GW and PP's boxes are a little thicker than Battle Front's. What also works really nicely are the boxes from any sort of frozen foods. These are about twice as thick and you'll probably have these on hand as well, plus it's one less thing heading to the land fills.

I add a few details, shown in the photos below. Names, window ledges and balcony walls made with tongue depressors/Popsicle sticks. For this scale, you might want to use new ones instead of used, as the moisture from one's mouth can cause the wood to swell and warp.
After adding the details, I give all the seams and edges a quick filing to clean up each level. Nothing says "I'M CARDBOARD" better than some frayed edges, like in the first picture.


This part is completely optional; I only did this to add some stability to the building, as my partner in war, Ilhan, has the biggest, meatyest, sausagey finger in the word. Because of his ham-fisted biology, coutless things get knocked over. These little pegs, made from kebab skewers, slot into holes in the bottom of the upper floor.


Lastly, here's a little bunker and barricade section I made using some lefter over pieces. I dimpled the flat surfaces of this one with the blunt point of one of my filing tools, to simulate bullet holes and to give the impression of concrete that's been beaten up a bit.

Before you starting painting any sort of foam, make sure you seal any exposed portions with some watered down PVA glue or a thick layer of cheap acrylic paint before priming. Some of the chemicals used in aerosol sprays will melt the foam into nothing, much like super glue. If you're using the glossier card like I am here, make sure you rough it up with some sand paper or some files before painting. This provides some nice grit for the paint to hold onto as well as a little bit of texture. You could also glue some regular old paper onto the surfaces of the walls or even use the thin tissue paper for wrapping presents to give it a bit of a stucco texture.
I hope this was helpful and I'll be posting either another tutorial on painting these or just pictures of the finished products!
No comments:
Post a Comment